
|
Getting Started / Templates |
Send comments on this topic |
Templates allow you to create a common view for all the topics, or for a set of topics in specific output formats.
In HelpSmith, you can edit a template by using the built-in word processor similarly to editing a regular topic. However, unlike a topic, a template should contain common elements which are the same for the topics that will be built using this template during the compilation process. For example, a template can contain the #TopicTitle variable, breadcrumb, navigation links, and the Topic Content Placeholder which defines where the topic's content will be inserted.
Using Templates
The Project Manager pane displays the templates of your help project under the "Templates" node. If you do not see the Project Manager pane, click the View tab, and then click Project Manager.
You can add an unlimited number of templates to your help project and control how a specific template is used. For example, you can set a template as the default template for a specific output format, such as HTML Help, Web Help, PDF, ePub, or Markdown. Beside that, you can set an individual template that will be used by a specific topic.
Add a Template
1.On the Project tab, in the Topics & Templates group, click the lower half of the Add button.
2.In the drop-down menu, click Add Template.
3.In the dialog, enter the title of the new template. Optionally, you can also select one of the presets.
4.In the Use As Default Template box, select the formats for which you want to set the new template as the default one.
5.Click OK.
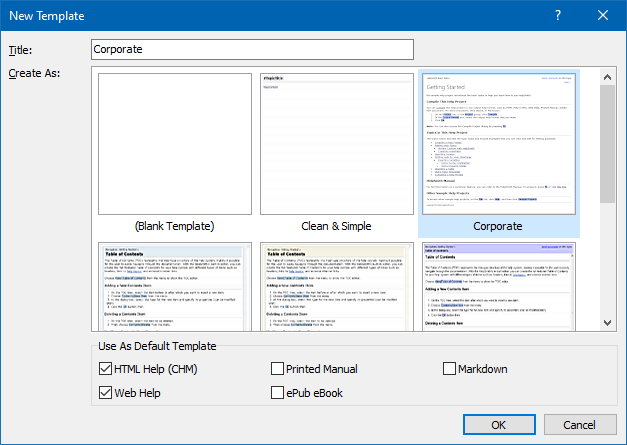
Adding a new template to the help project
Delete a Template
1.In Project Manager, select the template that you want to delete.
2.On the Project tab, in the Topics & Templates group, click Delete.
Rename a Template
1.In Project Manager, select the template that you want to rename.
2.On the Project tab, in the Topics & Templates group, click Rename.
3.Enter a new name for the selected template and press Enter.
A template must contain a special Topic Content Placeholder object which will be replaced with the actual topic content during the compilation process. If a template does not contain a Topic Content Placeholder, it will be ignored during the compilation.
To insert a Topic Content Placeholder into a template:
1.In the Project Manager, click the template you want to edit.
2.In the word processor, put the cursor to where you want to insert the Topic Content Placeholder.
3.On the Insert tab, in the Placeholders group, click Topic Content.
Using Templates, Variables, and Other Objects
Since a template is a document which works the same way as a regular topic document, you can edit it using any objects such as variables, images, tables, hyperlinks, and so on. For example, it is useful to put the #TopicTitle variable in the heading area, so it will be dynamically replaced with the actual topic titles during the compilation process. Also, templates allow you to setup the Non-scrolling Area only once and eliminate the necessity to setup it for each topic.
Template Groups
If you have a big number of templates in your project, you can organize them into groups for your convenience. Actions to add, delete or rename a group are similar to the actions on templates. To move a template (or another group) into a group, you can use the drag-and-drop method, arrows on the Project tab in the Topics & Templates group, or you can use keyboard shortcuts Ctrl+Shift+Left Arrow, Ctrl+Shift+Up Arrow, Ctrl+Shift+Down Arrow, Ctrl+Shift+Right Arrow.
Set the Default Template For a Specific Output Format
You can set the default template which will be applied to the topics in a specific output format, as explained at the links below:
•Set the Default Template For the HTML Help Format
•Set the Default Template For the Web Help Format
•Set the Default Template For the Printed Manual Format
•Set the Default Template for the ePub Format
•Set the Default Template for the Markdown Format
Related Links
Copyright © 2007-2026 HelpSmith.com