
|
Getting Started / Help Project |
Send comments on this topic |
A help project contains topics, templates, images, keyword index, project options, and other data needed to compile the final version of the help file or document in a specific output format, such as HTML Help (CHM), Web Help, Printed Manual, Adobe PDF, Microsoft Word, ePub eBook, or Markdown.
Help Project Formats
A HelpSmith project can be stored in one of the following file formats: .HSMX, .HSMP, and .HSM.
•The .HSMX format allows you to store topics, templates, and other data (except media files) in a single project file.
•The .HSMP format allows you to store topics, templates, and other data as a collection of separate .XML files.
•The .HSM format is a binary file format used by the previous HelpSmith 1.x-8.x versions.
For more information on the help project formats, you can visit this topic.
Create a New Help Project
1.On the File tab, click New.
2.In the dialog, specify the project Title, and Language settings.
3.If necessary, check the option Create default topic templates for this project to add templates for different output formats.
4.Click Create Project.
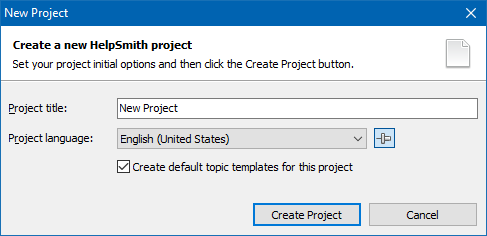
Creating a new help project
Open a Help Project
1.Click the File tab, and then click Open.
2.In the dialog, select the folder that contains your help project.
3.Select the project file (.HSMX, .HSMP, or .HSM) that you need.
4.Click Open.
Remark: You can also find your help project in the list of recently opened files. To access this section, on the File tab, click Recent.
Save the Help Project
1.Click the File tab, and then click Save (or press the Ctrl+S key).
2.In the Save As dialog, specify the destination directory and filename.
3.In the Save as Type box, select the format (.HSMX, .HSMP) in which you want to save the help project.
4.Click Save.
Remark: If you are saving a help project that already has a filename, this function will save it using the same location, filename, and format.
Save the Help Project to a Different Location, Filename, or Format
1.On the File tab, click Save As.
2.In the right side, select the format (.HSMX, .HSMP) in which you want to save the help project.
3.In the Save As dialog, specify the destination directory and filename.
4.Click Save.
Edit Project Options
A help project includes various options that are used when you compile the output help file or document.
To edit the project options:
1.On the Project tab, in the Project group, click Project Options.
2.In the dialog, change the parameters that you need.
3.Click OK.
Import Existing Help Files and Documents
If you have existing help files or documents created with other applications, you can import them into HelpSmith.
HelpSmith allows you to import Microsoft Word documents, RTF documents, HTML files, plain text files, compiled HTML Help files (CHM), and Microsoft HTML Help Workshop projects (HHP).
To use the Import feature:
1.On the File tab, click Import.
2.Click the appropriate button to import a file, or an entire folder containing files of the supported types.
You can visit this topic for more details on using the Import feature.
Related Links
Copyright © 2007-2026 HelpSmith.com