
|
Writing Help Topics / Working with Tables / Working with Tables |
Send comments on this topic |
HelpSmith allows you to insert and customize tables by editing the table's properties directly, or by applying a table style. This topic describes common operations on tables in the built-in word processor.
Insert a New Table
1.In the word processor, put the cursor where you want to insert a new table.
2.On the Insert tab, in the Tables group, click Table.
3.In the drop-down menu, define the number of rows and columns of the new table.
Alternatively, in the drop-down menu, you can click Insert Table to display a dialog with initial table values.
Remark: You will be able to change the table parameters including the number of rows and columns at any time.
Select a Table or Table Element
Before a particular operation on a table, or on an individual table element such as a cell, row, or column, you should first select the element that you need:
•To select a table or table element, you can simply click the table or element that you need in order to put the text cursor into it.
•To select multiple elements of a table, you can click the first element and while holding down the mouse button move the mouse cursor to another element.
After you have selected a table or one of its elements, you will see an additional Layout tab on the toolbar, which includes different operations that you can use to modify the current table.
To adjust the table selection before a particular operation, on the Layout tab, click Select, and then click the needed action in the drop-down menu.
Edit Table Properties
By editing table properties you can modify width, height, cell padding, cell spacing, background, borders settings of the entire table and/or specific rows and cells.
1.Select the table or individual table elements whose properties you want to edit.
2.On the Layout tab, in the Table group, click Properties.
3.In the Table dialog, change the parameters that you need.
4.Click OK.
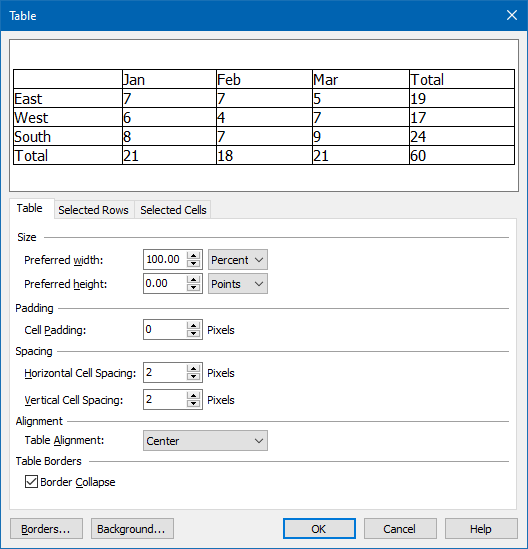
Editing Table Properties
Delete a Table
1.Select the table that you want to delete.
2.On the Layout tab, in the Rows & Columns group, click Delete.
3.In the drop-down menu, click Delete Table.
Insert Rows
1.Select the rows before or after which you want to insert new rows.
2.On the Layout tab, in the Rows & Columns group, click Insert Above or Insert Below.
Delete Rows
1.Select the rows that you want to delete.
2.On the Layout tab, in the Rows & Columns group, click Delete.
3.In the drop-down menu, click Delete Rows.
Insert Columns
1.Select the columns before or after which you want to insert new columns.
2.On the Layout tab, in the Rows & Columns group, click Insert Left or Insert Right.
Delete Columns
1.Select the columns that you want to delete.
2.On the Layout tab, in the Rows & Columns group, click Delete.
3.In the drop-down menu, click Delete Columns.
Delete Cells
1.Select the cells that you want to delete.
2.On the Layout tab, in the Rows & Columns group, click Delete.
3.In the drop-down menu, click Delete Cells.
Merge Cells
1.Select the cells that you want to merge into a single cell.
2.On the Layout tab, in the Merge group, click Merge Cells.
Split Cells
1.Select the cell that you want to split into several cells and/or rows.
2.On the Layout tab, in the Merge group, click Split Cells.
3.In the dialog, specify the number of rows and columns.
Remark: If you selected more than one cell, you can also check the option Merge cells before split, so the selected cells will be merged into a single cell before the split operation is applied to it. Otherwise, each of the selected cells will be splitted.
4.Click OK.
Using the Auto Fit feature
The Auto Fit feature allows you to automatically adjust the size of a table, table rows, or columns.
1.Select the table whose size should be fitted to the contents, or whose rows or columns you want to evenly distribute.
2.On the Layout tab, in the Cell Size group, click Fit Table to Contents, Distribute Rows, or Distribute Columns.
Related Links
Copyright © 2007-2026 HelpSmith.com