Using Bookmarks to Link to a Specific Place in a Topic
In addition to regular hyperlinks that allow you to link from one topic to another topic, you can also use the Bookmarks functionality to create links to a specific place within a topic. In other words, when clicking on such a hyperlink linking to a topic/bookmark, the HTML Help viewer or web browser displays the linked topic and automatically scrolls to the place of the bookmark location.
This video demonstrates how you can insert a bookmark into a topic, insert a hyperlink linking to that bookmark, and also link to that topic/bookmark from a Topic Link item that can be added to the Table of Contents.
You can follow the steps below to start using bookmarks in your help project.

Step 1: Insert a Bookmark to a Topic
- In the Project Manager, select the topic in which you want to insert a bookmark.
- In the word processor, put the text cursor where you want to insert a bookmark.
- On the Insert tab, in the Links group, click Bookmark.
- Enter a name for the new bookmark (for example: "my_bookmark").
- Click OK.
Step 2: Insert a Hyperlink Linking to a Specific Place in a Topic
You can insert a hyperlink that will link to a bookmark in another topic.
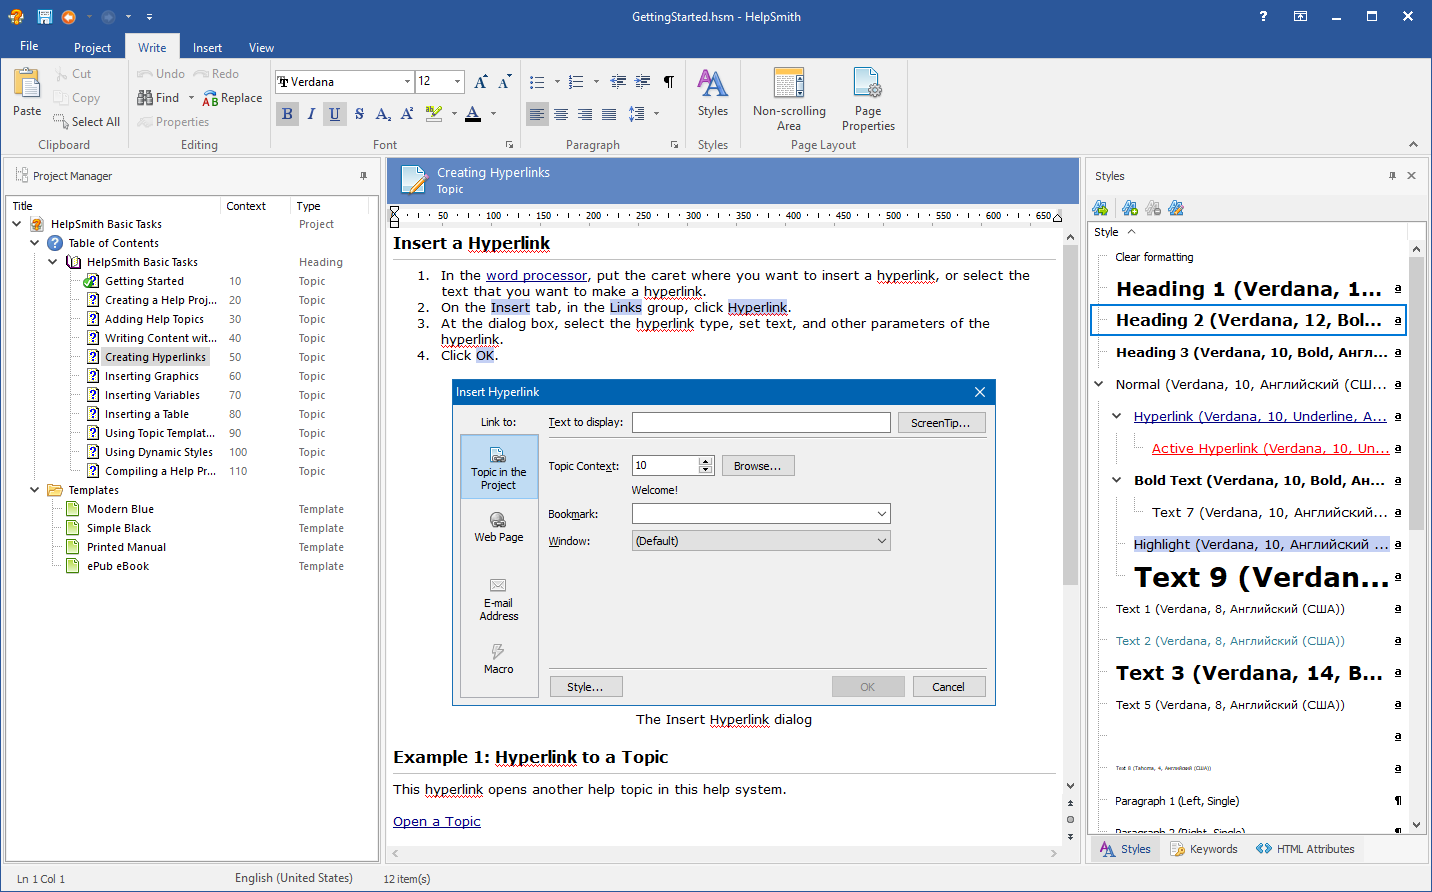
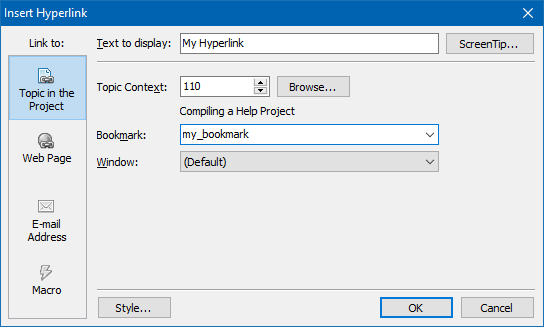
- In the Project Manager, select the topic in which you want to insert a hyperlink.
- In the word processor, put the text cursor where you want to insert a new hyperlink. Alternatively, you can select the text that you want to convert into a hyperlink.
- On the Insert tab, in the Links group, click Hyperlink.
- In the Hyperlink dialog, in the Topic Context box, specify the topic containing the bookmark.
- In the Bookmark box, select the bookmark that you need.
- Click OK.
Step 3: Link to Specific Place in a Topic from the Table of Contents

HelpSmithg allows you to link to a bookmark not only from a hyperlink as explained in the previous step, but also from TOC items in the Table of Contents.
- On the Project tab, in the "Topics & Templates" group, click Add.
- In the TOC Item properties dialog, in the left sidebar, select the new item's type, such as Topic or Topic Link.
- Specify the item's title, the topic containing the bookmark, and also the bookmark name that you need.
- Click OK.
Remark: Please note that by clicking the bottom part of the Add button (arrow icon), you can specify the position of a newly added TOC item. Alternatively, you can change the TOC item's position later by moving the item with the mouse.
Compile Your Help File or Manual
Now you can generate your HTML Help (.CHM) file, online help system, or PDF manual (by clicking Project tab|Compile, or by pressing F9) and test your hyperlink and TOC item that should display the linked topic and scroll to the location of the bookmark.
It should be noted that the Bookmarks functionality is supported by most documentation formats including HTML Help (CHM), Web Help (browser-based Help), Printed Manual, PDF, and Word documents. Thus, you can use this feature when you need to direct the user of your help file not only to a specific topic, but also to a specific place in a topic.