|
Using the Image Tool / Adding Annotations to an Image |
Send comments on this topic |
The functionality described in this topic is available in HelpSmith Professional (or higher) edition only.
The Image Tool allows you to add various types of annotations, such as rectangles, balloons, arrows, lines, text labels, control annotations for UI elements, clickable hotspots, and other objects to any image in your documentation. You can add annotations when creating a new screenshot, or when editing an existing image in a topic.
Edit Annotations of an Existing Image
1.In the word processor, hover the mouse over the image that you want to edit.
2.In the top-left corner of the image, click the Edit Image button.
3.Use the Image Tool to add, edit, or delete the annotations that you need.
4.Click OK.
Add an Annotation to the Image
1.Open the image for editing with the Image Tool, as explained above.
2.On the Annotations tab, in the Add Object group, click the annotation type that you want to add.
For example, you can select balloon, arrow, shape, text, control annotation, hotspot, cursor, etc.
3.In the dialog, set the desired parameters of the annotation.
4.Click OK.
Edit Annotation Properties
1.In the Image Tool, double-click on the annotation that you want to edit.
2.In the dialog, change the parameters that you need.
3.Click OK.
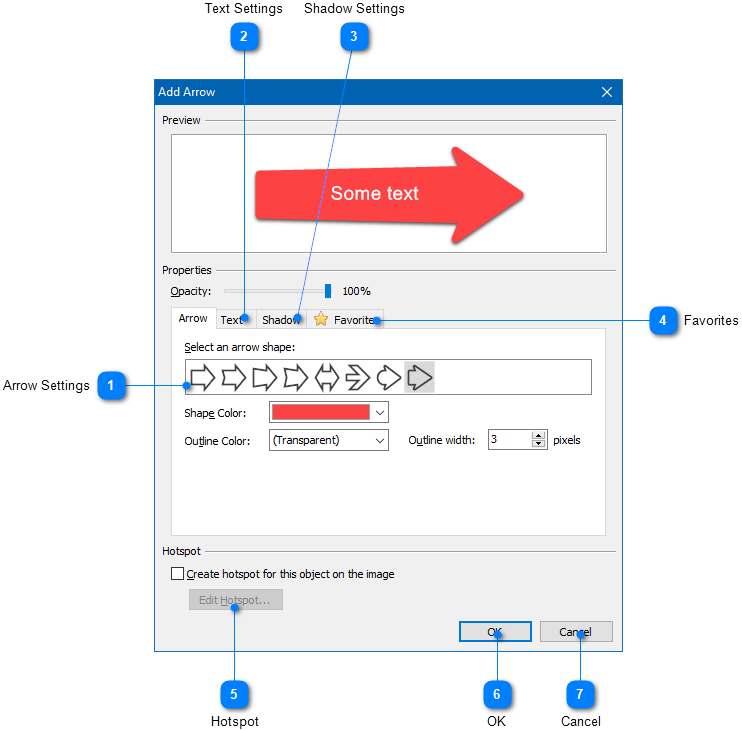
Editing Properties of an Arrow Object
|
Favorites |
|
|
Allows you to save the current annotation settings to Favorites for future use, or load annotation settings from an existing preset. Also, on the Favorites tab, you can set the default annotation style that will be used for a new annotation object. |
|
|
|
|
|
Hotspot |
|
|
Allows you to specify hotspot properties, so the annotation will work as a clickable hotspot. |
|
|
|
|
Position and Resize Annotations on the Image
The Image Tool allows you to position and resize the selected objects by using the mouse.
To position and resize the selected objects precisely, you can use the arrow keys on the keyboard. To resize a selected object, you can use the arrow keys while holding down the Shift key. In addition, while moving or resizing an object, you can hold the Ctrl key to increase the offset.
Remark: To select more than one annotation, you can click on the objects while holding down the Ctrl key.
Rotate Annotations on the Image
The Image Tool allows you to rotate a selected object by using the mouse.
To rotate the selected objects precisely, you can use the arrow keys on the keyboard while holding down the Alt key. In addition, while rotating an object, you can hold the Ctrl to increase the offset.
Remark: To select more than one annotation, you can click on the objects while holding down the Ctrl key.
Using the Auto Alignment and Size Buttons
The "Auto Alignment and Size" buttons available on the toolbar in the Image Tool allow you to quickly position and resize the selected objects relative to another object.
The "Auto Alignment" buttons (for example: Align by Left, Align by Top, etc.) position the selected objects relative to the first selected object.
The "Auto Size" buttons (for example: Make Same Width, Make Same Height, etc.) make the width or height value of the selected objects the same as the first selected object.
Remark: To select more than one annotation, you can click on the objects while holding down the Ctrl key.
Related Links
•Exporting Control Annotations to the Topic
Copyright © 2007-2026 HelpSmith.com


