
|
Using the Image Tool / Using Control Annotations |
Send comments on this topic |
The functionality described in this topic is available in HelpSmith Professional (or higher) edition only.
The Image Tool allows you to add control annotations for user interface elements (such as buttons, input boxes, etc.) that can be exported directly into the topic where you can provide a detailed description for each control, or for a group of controls under a single annotation.
Edit Annotations of an Existing Image
1.In the word processor, hover the mouse over the image that you want to edit.
2.In the top-left corner of the image, click the Edit Image button.
3.Use the Image Tool to add, edit, or delete the annotations that you need.
4.Click OK.
Add a Control Annotation to the Image
1.Open the image for editing with the Image Tool, as explained above.
2.On the Annotations tab, in the Add Object group, click Control Annotation.
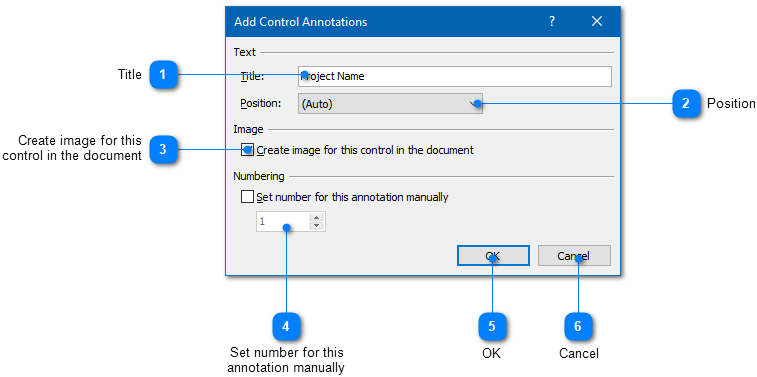
3.In the dialog, specify the annotation title and other parameters.
4.Click OK.
Edit Properties of Control Annotations
In the Image Tool, you can edit properties of one or more control annotations:
1.Select the control annotation(s) that you want to edit by clicking on it.
2.On the Annotations tab, in the Editing group, click Properties.
3.In the dialog, modify the annotation's title and other parameters.
4.Click OK.
Remark: To select multiple annotations for editing, you can click on them while holding down the Ctrl key.
|
Create image for this control in the document |
|
|
Specifies if the control image should be exported to the document. |
|
|
|
|
|
Set number for this annotation manually |
|
|
Allows you to define the number of this control annotation manually. If this option is not set, the number will be defined automatically depending on the annotation's position. |
|
|
|
|
Positioning Control Annotations on the Image
Unlike regular annotation objects (balloons, arrows, text lables, etc.), a control annotation consists of two elements: an element with the number, and the rectangle object that determines the bounds of the control or a group of controls (i.e. UI elements) on the image.
You can position control annotations on the image by using the mouse, arrow keys on the keyboard, or by using the "Auto Alignment and Size" buttons available on the toolbar. For more details on positioning and resizing annotation objects, you can visit this topic.
Also, you can use the Reformat button, available on the toolbar in the Image Tool, to automatically reposition the control annotations depending on the positions of the corresponding controls.
Related Links
•Adding Annotations to an Image
•Exporting Control Annotations to the Topic
Copyright © 2007-2026 HelpSmith.com