
|
Using JavaScript and CSS Styles / Including JavaScript and CSS Styles |
Send comments on this topic |
HelpSmith allows you to include and use JavaScript and CSS stylesheet files in help topics of HTML Help (CHM) files, Web Help systems, ePub eBooks, and also in the HTML layout of a Web Help system.
This means that you can write your own scripts, use an existing JavaScript library such as jQuery/jQuery UI or any other popular framework. Also, you can add a custom CSS file to your HTML-based documentation to apply any special formatting attributes supported with web browsers.
Access JavaScript and CSS Files Used in the Help Project
1.On the Project tab, in the Project group, click Project Options.
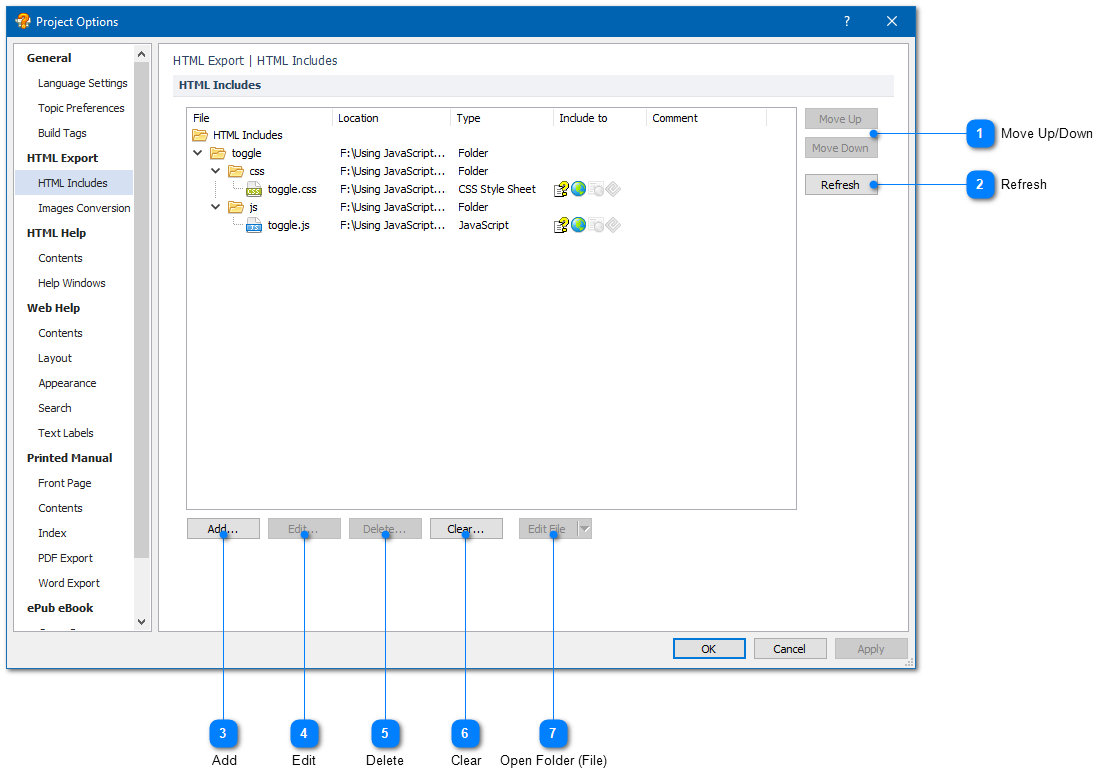
2.In the Project Options dialog, in the left sidebar, under HTML Export, click HTML Includes.
3.Using the appropriate buttons, you can add, edit or delete a JavaScript or CSS stylesheet file to or from your help project. Also, you can add an entire folder containing JavaScript, CSS, image, and other files.
4.Click OK.
Below is a description of operations available in this section.
|
Move Up/Down |
|
|
Allows you to control the order of included JavaScript and CSS files. This determines the order of files within the Head section in generated HTML files where the JS and CSS files will be used. |
|
|
|
|

|
Refresh |
|
|
Updates the list of files included to the help project. In case a folder is included and any new JS or CSS files were added to that folder, the new files will also appear in the list. |
|
|
|
|
|
Add |
|
|
Allows you to add a new JavaScript, CSS stylesheet file, or a folder containing a set of JS and CSS files. |
|
|
|
|
|
Open Folder (File) |
|
|
Opens the selected folder in Windows Explorer, or opens the selected file for editing in your preferred editor. |
|
|
|
|
Include a JavaScript, CSS Stylesheet File or a Folder
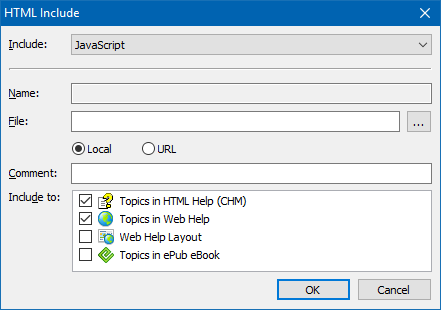
1.Click the Add button.
2.In the Include box, select what type of inclusion you want to add such as JavaScript, CSS Style Sheet, or a Folder containing a set of JS and CSS files.
3.In the File (Folder) box, specify the path to the included file or folder. Use the Browse button to locate the desired file or folder on the hard disk.
4.In the Include to box, check where the included files will be used. For example, you can include a script file or style sheet for use in the topics of your HTML Help (CHM) system, in the topics of your Web Help system, or in the HTML layout of your Web Help system.
5.Click OK.
Including a JavaScript or CSS File
Storage of Included JavaScript and CSS Files
HelpSmith allows you to include JavaScript and CSS style sheet files from any location on your computer. You can see the current location of an included file in the Location column in the Project Options dialog as shown on the screenshot above.
However, when you save your help project, HelpSmith automatically copies the included files to a sub folder located in the same directory as your project file.
Using jQuery Framework
If you use the jQuery framework to interact with elements on an HTML page, you do not need to include the jQuery library file to your help project since HelpSmith automatically links jQuery to the topics in HTML Help (CHM) and Web Help systems, and also to the HTML layout of the Web Help system.
Example of Using JavaScript and CSS in a Help Project
You can find a sample help project named "Using JavaScript and CSS" on the Start Page in HelpSmith. The help project implements a Toggle script that allows you to add collapsible sections in help topics of your HTML Help (CHM) and Web Help system.
Related Links
•Editing Attributes of HTML Page Elements
•Inserting HTML Code to a Help Topic
Copyright © 2007-2026 HelpSmith.com